Sunday, September 27, 2009

Cobbler: Just Peachy, with a little Apricot love

Photobucket

Moving can be so stressful!! Packing up every little bit of your life and transporting it to a whole new set of surroundings, but it can also be really exciting!! We've had quite a friends who've relocated recently~ We celebrated Naomi's new place with ICE CREAM CONE CUPCAKES and this cobbler was all about Natalie's big move!! Super hot temps made me crave something that was cold and refreshing, but if I'd made an ice creamy dessert it would have been all kinds of melty pretty quick! The late-summer early fall peaches and nectarines had been awesome, so peachy cobbler made perfect sense. Because the white peaches smelled incredible, I choose those, but to birghten it up a bit I grabbed a few ripe apricots and the mix was delish.
This could work with a variety of fruit combos, there will be an apple or apple-pear version coming soon, no doubt.

Photobucket

I had not really made a cobbler since last summer's MIXED BERRY COBBLER which was from "Baking From My Home to Yours" by Dorie Greenspan and it was MY pick for Tuesdays with Dorie!! This is my version of stone-fruit cobbler, so it is a lil different from Dorie's recipe- but I think it's delicious all the same~

Photobucket

Serves 12-16

5-6 ripe sweet peaches
4 apricots
1 tsp cinnamon
3/4 c white sugar

1/2 c shortening
1/4 packed light brown sugar
1/4 white sugar
1 1/2 c flour
2 tsp baking powder
1/2 tsp salt
1 c buttermilk
1 c boiling water
3 T butter

Oven to 350 grease a 9 x 13 baking dish
In large bowl combine the fruit sugar and cinnamon and set aside
In a medium bowl cream the shortening and sugar and slowly add the flower, baking powder, salt and buttermilk a little of each at a time until all ingredients are well combined.
Pour the batter into the pan and spread evenly. Pour the fruit over the batter and spread evenly. Melt the butter in the water and pour the water over the batter & fruit~
Bake for 1 hour 15 to 1 hour and 30 minutes.
Let cool and serve a bit warm with vanilla ice cream.

Photobucket

Thursday, September 24, 2009

Thursday Tweet Treats~Adam's PB cookies

So this weeks Thursday Tweet Treat will have to be photo-less for a few days, don't worry, I'll get it updated ASAP! Priorities people!! As I type this it is 11:30pm on a work-night, I have a cheese cake in the oven, a buttermilk apple spice cake preppin and a Saturday tailgate menu to plan and well, make! This Thursday's Tweet Treat recipe is comin atcha courtesy of my friend Adam.

3-ingredient, no flour, Peanut Butter Cookies~ These were incredibly easy and a great thing to make when you need your sweets fix, but don't have a ton of time of ingredients handy!

Thank you for sharing this with me via the Sweet Life Kitchen Facebook Fan page, ADAM!! Mucho Appreciated!!

Follow Sweet Life Kitchen on twitter @oursweetlife to check out this weeks Tweet Treat Recipe!


I also back his reccomendation to add some dark chocolate chips- YUMTASTIC!!

Sunday, September 20, 2009

Bacon Brunch Quiche

Photobucket

You may not automatically equate quiche with tailgating, but it's actually a match made in heaven.
It's a perfect tailgate item for an early game, OR for when you have overnight guests (we tend to have more friends visit in the fall for some reason...) because you can make this the night before and just give it a little re-heat before chowing down!

Our first home game of the season was a 12:30 kick off, and we made plans to meet friends downtown on campus at 9:30am so I had to think of a tailgate menu that would be delicious and brunchy. I made Dorie Greenspan's basic biscuits using whole wheat flour and brought fresh berry jam, we grilled a bunch of chicken apple sausage, and since I've been on a banana bread kick this month (that post is on it's way) I made banana blueberry muffins. This quiche was the savory centerpiece to this picnic tailgate brunch, it was super easy and incredibly delicious.

Photobucket

Serves 8-10

1 9 inch prepared pie crust
1 cup milk
3-4 eggs
1/2 cup chopped onions
1/2 cup chopped bell pepper
6 pieces bacon, fully cooked, cooled and chopped into little bits
3 dashes hot sauce
1 cup shredded cheese
Salt
Pepper

Lightly grease a removable-bottom-non-stick tart pan and pre-heat the oven to 450. Lay the pie crust as centered as possible into the pan and lightly press a piece of foil on top of the crust. Bake for 10 minutes, remove foil, reduce heat to 350 and bake another 5-7 minutes, pull out of oven and sprinkle hot crust with 1/2 of the shredded cheese, set aside and let cool.
In a medium pan saute a the onions and bell peppers with a little butter, about 3 minutes until they get a little soft...
In a medium bowl beat the eggs, add milk, a few dashes of hot sauce, salt, pepper and stir to incorporate all ingredients. Sprinkle the chopped, cooked bacon and the onion/pepper mix as evenly as possible in the pie crust on top of the cheese layer. Pour the egg mix in and top with the rest of the shredded cheese. Bake at 350 for 45 minutes. Let cool, slice up and ENJOY!

Photobucket

Saturday, September 19, 2009

Happy Package Day

Photobucket

OOOOOoooooBOY!!! I absolutely love giving and receiving anything food related. It just brings a smile to my face~

I am VERY excited about the COOKBOOK GIVEAWAY that we've had cookin here this week and on Tuesday I got to giveAWAY a cookbook. Just to prove that karma does in fact exist, I recently RECEIVED two super-spectacular goodies.....

These two will be making more than one appearance in upcoming posts, possibly even sharing a recipe, so I wanted to tell you all about them!!
Photobucket

This first fantastic gift is VERY special to me, for all sorts of reasons. We have quite a few loved ones (friends, family, Labrador retrievers, pugs, etc.) in the P.N.W....Pacific North West....ever so beautiful Oregon. We've seen this state at several different times of year, and my favorite is when the berry picking is prime time~ When I saw (via the magical window to the world that is Facebook) my friends Douglas & Mishele were out enjoying the bounty of Oregon berry picking, I not so subtly suggested that they cram a bunch of berries in a FedEx box and send it to SoCal. Well, they did way better than that. They picked berries, then made their "Don't Let Summer End" Blackberry Jam. Patented. THEN, on a business trip to L.A. this week, Douglas BROUGHT ME A JAR of this jam.....look at it....Oh my goooooodness.

Photobucket

Stay tuned~ I feel scones or another round of biscuits comin on!!

THANK YOU TO Douglas, Mishele, Acacia, and Alaya! We are very thankful for our jam!!!

Photobucket

To make a great day extra great, it was a twofer and I also received some ORGANIC VANILLA EXTRACT from Singing Dog (how great is that name, can you think of a singing dog and not crack a smile?) I am really looking forward to making some delicious recipes with this vanilla, and of course I'll tell you all about it!! I am excited to work with this brand and do want to try all of their products because they believe in promoting sustainable, organic, and socially responsible practices, and I am way down with that!

So that's my happy-package-day, I can't wait to contribute to someones happy-package-day soon when we host another giveaway here at Sweet Life Kitchen! YAY!!

Thursday, September 17, 2009

Thursday Tweet Treats~ Peach Pie Honey Q

YAY!! It's THURSDAY!! Time for our Thursday TWEET Treat, just a little bit more work-week and it will be Saturday :o)
In case you are just tuning in, and wondering what the heck a Tweet Treat is, lemme bring you up to speed...If you CLICK HERE to follow me on Twitter, every Thursday I will TWEET a complete recipe- ingredients, instructions all in 140 characters or less!! A recipe has to easy-peasy when it can only be a few sentences max.
The recipe itself can be found only on Twitter, every Thursday. This weeks Tweet Treat is a Peach Pie Honey Q...wonder how to make it? Fly on over to Twitter to see!

Photobucket

You know me, I can't resist snappin at least one pic...so you can always SEE the TWEET TREAT recipe here in the Sweet Life Kitchen.

This is a very simple dessert that is also very yummy! This would be a great hands-on recipe to make with the kids and because it is lil individual pie curly que, you could doll these up with a baby scoop of vanilla ice cream for a dinner party!

Wednesday, September 16, 2009

We've got a WINNER!!!

Photobucket

YAY!! This giving stuff away thing is beyond fun....I may just have to do it again. Soon....

This post is all about the WINNER of our FIRST ever giveaway here at Sweet Life Kitchen~
A week ago I wrote THIS post and want to thank all 41 folks who left a comment!! How exciting!

So Tuesday at 6:00pm PST, when I got home from a big day at work and big workout at Bar Method, I punched the numbers 1 to 41 into the "Random Number Generator" over at Random.org....and the winner IS.......

NUMBER 22....

Photobucket

No, I am not going to make you count down to the 22nd post response, it's fellow foodie blogger; JAMIE!!! CONGRATULATIONS JAMIE!!!

This is awesome because Jamie has a fabulous blog that I had never seen, and now not only do I get to enjoy it, but you all get to know about it too!!

CLICK HERE to check out all the drool-worthy goodness over at JAMIE'S GREEN KITCHEN!!

So from Dorie's home to mine...and my home to JAMIE'S GREEN KITCHEN,

HAPPY BAKING EVERYBODY!!!

Stay tuned for our next giveaway coming very, very soon.....

PS- If you are reading this and have a product that you would like us to feature here as one of our Giveaways, don't be shy!! Email me or leave a comment on this post with your contact info and we'll do some giving together!! YAY!

Monday, September 14, 2009

Sushi Night~ Making Sushi at Home

Photobucket

For some reason we used to make sushi A LOT and have not made it for a LONG time...Sushi a great get together food, and we do love having people over, so I'm going to have to get back with it and start working it into the routine more! The reason we only do sushi when we have friends over is because, I can't control myself at the market and always buy a ton of fish!

I think this is one of those items that people don't think of as something to make for a dinner party. It really is fun and not too difficult to DIY, and MAKE SUSHI AT HOME!! Even if you are not into raw fish (fry some shrimp in tempura batter, or find a good recipe for tamago (the egg/omlete sushi) you can always go veggie sushi and sup carrots, asparagus, eggplant and other yummy veggies for fish if you want! Due to the nature of rolls, you don't really want to make them ahead (the moisture in the rice will make take the crispness out of the nori/seaweed), so when we do sushi I always make a menu plan and pace it out. Having plenty of yummy sake and Japanese beer on hand as well as a big bowl of steamed edamame is also a must! Just add some great friends, good music and you've got an amazing evening on your hands.

I made this dinner for a couple of friends (and Nate who was still recovering from not feeling well) earlier this year, just after New Year's Eve. Nate is sushi-master when we do this so I was a little nervous heading up the operation vs assisting him... I always like to make something special and have friends over to kick off the year ASAP every January, even if it takes me all freakin year to get around blogging about it!! As you have certainly noticed, I am back in the blogswing full time now so in addition to all the goodies we've been making lately, there will be some early 2009 throwbacks comin atcha too!!

~Menu~
Served 4
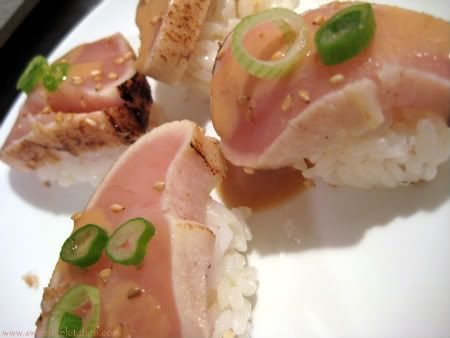
Albacore Nigiri Sushi (1 piece per person)
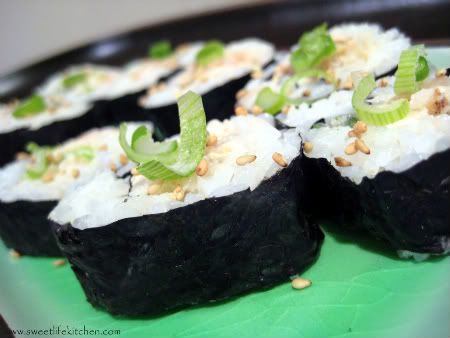
Albacore & Green Onion Cut Roll
Toro/Bluefin Tuna Nigiri Sushi (2 pieces per person)
Salmon Nigiri Sushi (2 pieces per person)
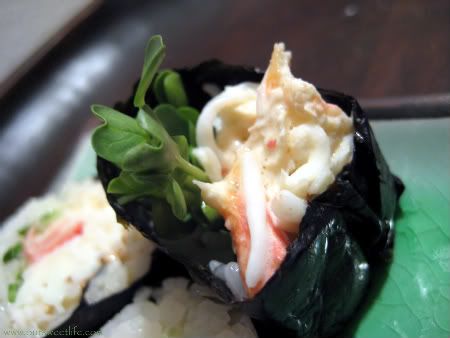
King Crab Leg Cut Roll with Raddish Sprouts
Spicy Tuna & Yellow Tail Cut Roll

Photobucket

Making sushi is not super easy, but it is also not major surgery. I am hoping this will be a helpful guide and instruction on making it for yourself! Thankfully, I was able to find some AWESOME videos courtesy of Le Miu's Sushi that really make this much easier to get with.

I will update this soon with details and photos from a more-recent sushi session, but here's the basic rundown. I am also hoping to take a knife-skills class before the end of the year, and can't wait to see how much better it will be the next time we do sushi.

OK, first and foremost, you are working with raw fish, so CLEAN THAT KITCHEN, even if it's clean already, clean it again!! You will want to use a lot of vinegar and lemon juice to get the kitchen, cutting board and all surfaces super clean (and not all chemical'ly).

Photobucket

Here is the "stuff" you are going to need.
A non porous cutting board (I always wipe it down with a damp towel splashed with a little vinegar/lemon)
A SUPER SHARP knife, for fish
Another very sharp knife for veggies
2 clean dish towels, one dry and one you will want to get damp with water, splash it with vinegar and fold it to lay the blade of your knife on when not slicin', and to wipe the fish knife after each use.
A bowl with water and a splash of vinegar for dippin your fingers so the rice dosen't stick to em.
Saran wrap
A large bowl (and small-holed collander or strainer) for washing the rice
If you want to make rolls, there are bamboo sheets for rollin those up and you will need one- cover it in saran wrap.
Plates for servin, and little bowls for soy sauce!
I use a rice cooker, but you can use a pot on the stove too..
A BIG non-metal bowl and plastic or wooden spoon to "toss" the rice while cooling it to room temp

The items you'll need from the market~
Ginger
Wasabi (we get the powder and make it by adding water, it also comes all mixed in a tube)
Soy Sauce
Smelt eggs
White sushi rice
Rice Vinegar
White sugar
Salt
Sesame seeds
Nori (sheets of seaweed)
Siracha hot sauce
Kewpie Japaneese Mayo
Cucumber
Avocado
Radish sprouts
Fish* YOU WILL NEED TO GO TO A SUSHI FISH MARKET, we go to MITSUWA, or Nijiya....this is RAW FISH, don't leave it out- follow the instructions below of keeping it in the refrigerator when not slicing or eating it. Do as much research as you'd like before attempting this outside of a restaurant. I am in no way endorsing that you do this, just sharing our experience of doing it. Also, if you are pregnant or have any other food allergies please consult your doctor.

Start by taking care of all the prep work, and setting up your dojo so that as soon as your rice is made, mixed and cooled- it won't be such a big deal to assemble the rolls and get to the best part- EATING!!

You'll want as much counter space as possible (not an easy task in our apartment kitchen). I use the large cutting board as the center piece to the operation and set up the knives, dry towel, vinegar dippin bowl and prepped food items all around the board. This way everything is at arms length and makes the whole process easier.

Now, get your sushi rice started...
It is true that this is really the most difficult part of making sushi- getting the rice just right. In Japan, craftsmen apprentice for years before they officially take over making the rice, it's serious stuff. I am so happy I was able to find these videos on www.5min.com, they are incredible helpful and I feel like it is much clearer to just watch exactly what to do!! The rice will take about an hour to cook (20 minutes cooking, 20 resting in cooker then mixing with sushi vinegar and cooling) So you can pace your prep accordingly!


For the menu above, the food prep entails:
Slicing the fish for the Nigiri sushi.
This would be really hard to type out an explanation for- we just happen to go out to sushi A LOT and sit at the bar A LOT so we've watched sushi chef slice up many, many, many meals.
I think it's best to watch someone do this first hand so here is some assistance from Le Miu's Sushi, which has AWESOME, very helpful videos- like this one below (I just slice a little thicker for the sushi pieces and a little thinner for sashimi pieces, but the technique is the same...)


Slice up your fish, plate it wrap with saran and refrigerate until it's go-time.

Remove the shell from the crab legs, shred the crab meat, mix it in a small glass bowl with a little bit of the Kewpie Mayo and a 1/2 tsp of smelt egg. Cover with plastic wrap and refrigerate until you are going to make this roll...

Chop up the albacore for the albacore garlic roll. In a glass bowl mix chopped albacore, 1-2 tsp Kewepie mayo, 1 T chopped garlic, a big pinch of sesame seeds and some thinly sliced green onion. Cover with plastic wrap, fridge, yada-yada-yada...

Chop up the yellow tail and tuna for the spicy sushi rolls and put each in a glass bowl. To each bowl add 1/2 tsp smelt egg, 1-2 tsp Kewpie mayo, add the siracha hot sauce in dashes, stirring after each dash until it reaches your desired level of spicydom. Add a pinch of sesame seeds to each bowl, mix all ingredients in each bowl- plastic wrap + frige...

Prep all the veg....
Cut each avocado, then into thin slices, squeeze a lemon over lightly to keep it from browning.
Thinly slice up 4 green onions.
Cut the root bottom off the radish sprouts, rinse them thoroughly, pat dry and place on the side in a bowl.
Place a small bowl filled with wasabi to the side of the cutting board too.
Cut the ends off the cucumber, cut it in half width wise, then in half length wise, then into thin spears.

OK, you are ready to ROLL.
Get your serving dishes ready, and once again, enjoy these super-helpful videos!!


This next video is a roll we did not make this time, but it's another easy one to add to your menu!! For the spicy rolls on my menu, and the albacore-garlic roll, exclude the wasabi and just scoop the filling onto the rice where he is placing the tuna slices.


As I said, I tend to pace this out- start with some nigiri, and when it's ready to serve we all eat together, talk a little, then I hop up to make the next item...I like this because the dinner process is a little longer which is fun and gives us all time to catch up and enjoy! Feel free to email me ANY questions you may have on this post!! beth@sweetlifekitchen.com

Photobucket

Sunday, September 13, 2009

COOK BOOK GIVEAWAY REMINDER!!

Hey guys!
Don't forget about the BFMHTY Cookbook GIVEAYWAY that will be happening in just two days!!

Photobucket

~CLICK THIS LINK~ to see the original post and details on how to enter to win one of my favorite books of all time!!
The cut off is TUESDAY SEPTEMBER 15, 2009 at 6:00pm PST.

Here are some of the yummy things I've made from Dorie's book Baking: From My Home To Yours....

Photobucket

WORLD PEACE COOKIES

Photobucket

DEVIL'S FOOD WHITE-OUT CAKE

Photobucket

BLACK & WHITE BANANA LOAF

Photobucket

THANKSGIVING TWOFER PIE

Photobucket

ARBORIO RICE PUDDING

Photobucket

RUGELACH

Don't forget Sweet Life Kitchen's FIRST GIVEAWAY EVER!!!~CLICK HERE for DETAILS~

Friday, September 11, 2009

Peach, Avocado & Heirloom Tomato Salad

Photobucket

Here is another awesome easy-weeknight-dinner, especially while the weather is still nice and warm and eating dinner out on the patio is still an option!
I'd recently discovered the "herb" salad mix at Trader Joes (and WholeFoods) that has lil bits of fresh dill and other herby herbs that give this salad extra fresh awesome flavor. We had a veggie-tastic dinner and ate this salad with a side of grilled butternut squash, BUT for a more protein-centric alternative, marinate 1 lb of boneless skinless chicken breast in 1/2 the dressing mix and grill it up!


Photobucket

Here's the salad details
Serves 2-4

1 large, firm heirloom tomato chopped
1 avocado chopped
1 large yellow peach chopped
handful coarsely chopped almonds
1/2 bag herb salad mix

Lightly toss all of the above together in a large bowl. Drizzle about 1/3 of the dressing (recipe below) over, lightly toss to coat with dressing, and add fresh ground black pepper to taste.

Dressing
you will only use about 1/3 of the dressing and save the rest to marinate some chicken for grillin!)

Photobucket

2 oz olive oil
a little over 1 oz balsamic vinegar
fresh cracked black pepper
pinch of sea salt
1 big tablespoon full fat free Greek style yogurt

Photobucket


Don't forget Sweet Life Kitchen's FIRST GIVEAWAY EVER!!!~CLICK HERE for DETAILS~

Thursday, September 10, 2009

Grilled Bison Meatloaf

Photobucket

Bison is a great substitute for ground beef...it's lower in fat and cholesterol and tastes awesome!! I made some really delicious BISON MEATBALLS to tote with us to the Hollywood this summer, and not too long after that, Nate whipped up this bison meatloaf on the grill~ it was sensational!! This is a good easy-weeknight dinner to make while the weather is still grill-friendly. One bowl, one thick foil packet, and then you could even eat on paper plates if you aren't in the business of doing dishes this week!!

It's hard to believe that the summer is past and that it's back-to-school-time all over again! I will be adding a "Weeknight Dinner" label to some simple but very yummy dinners that will help everyone get back in the back-to-school swing of things. Just because the days literally start getting shorter and there is so much more stuff to get done, doesn't mean you shouldn't have an awesome dinner!!

Keep a package of Hawaiian rolls in the freeze, they'll last you more than a week and you can just toast em up as a side item, easy-peasy!
Another great option is making a big batch of brown rice at the beginning of the week (or on Sunday) and keeping that to heat up necessary portions with out the prep work!

Here is a fun twist on a comfort classic, for a healthy veggie side item chop up a bunch of cauliflower and peel 3-4 cloves of garlic. Lay out 2 layers of foil (enough to fold up around the cauliflower and garlic. Add a little bit of chopped up butter (less than 1 T.) a pinch of salt and some cracked black pepper...put this foil on the gril at the same time as the meatloaf and when it'd done, mash all packet contents with a potato masher~

Photobucket

Onto the MEATLOAF~

1 lb ground bison
1 T bbq sauce
1 T spicy brown deli mustard
Heaping 1/2 cup bread crumbs
1 egg
a few tsp parsley
1/4 of a sweet white onion finely chopped
few good shakes of garlic powder
Kosher salt & fresh ground pepper
bit o chili flakes- just a pinch...
1 carrot sliced in coin slices
1/2 bulb fennel, chopped up.

3 zucchinis for a side dish, if you want...

In a large bowl mix bison, bbq sauce, mustard, bread crumbs, egg, parsley, onion, garlic powder, salt, pepper and carrots.
Lay out 2 big layers of heavy duty foil in a + formation. Heat the grill to medium heat.
Form the meat mix into a loaf and place in the center of the foil, surround the loaf with fennel, top w bbq sauce, wrap up and grill on medium heat for about 40 minutes.

When the meatloaf is almost done slice a few zucchinis thinly length wise and lightly butter each side and lightly salt & pepper each slice. Grill 2 minutes each side.

Photobucket


Don't forget Sweet Life Kitchen's FIRST GIVEAWAY EVER!!!~CLICK HERE for DETAILS~

Thursday Tweet Treats~

This week's Thursday Tweet Treat is a truly sensational, uber easy frozen, refreshing desert that uses just ONE ingredient.

Photobucket

I certainly did not make this discovery first hand, and you can scope out this dairy-free, one-ingredient- "ice cream" over at The Kitchn on August 19th and on Instrucables.com recently too!!

Are you wondering how to make this creamy goodness??

Wanna know what the ONE ingredient in this "ice-cream" is? Well if you follow me on Tiwtter, I will be tweeting the recipe at least three times today, and just so you don't miss it, from now on, just before the Tweet Treat Tweet I will do an announcement tweet with the title of the recipe and "#recipe", hopefully this will make it easier to spot!!

Photobucket

Don't forget Sweet Life Kitchen's FIRST GIVEAWAY EVER!!!~CLICK HERE for DETAILS~

CLICK THIS LINK to FOLLOW ALONG on TWITTER!

Wednesday, September 9, 2009

Just Halibut....and a whack photo.

This is totally phoning it in in the photo department~ my apologies. This photo was taken after the good light of the day had passed. It was also, unfortunately, taken with anger because I'd just shattered my NEW pretty yellow Le Creuset rectangle baking dish. :( You will get to enjoy that baking dish just like I did, once...it'll be featured in the upcoming Peach & Apricot cobbler post. Blast. I miss it already...
ANYHOW~
This is super simple, dinner-in-minutes, healthy meal...add a baked potato, rice or a toasted Hawaiian roll if you'd like. I made this after a looong Labor Day weekend eating marathon. So we just kept it simple halibut, roasted garlic and spinach. I also had a few scallops and cooked them right along with the halibut~ they weren't cooked properly though so I am excluding the 'splaination in this post...more scallop recipes coming soon.

Serves 4

4 4oz Halibut steaks
1 bunch spinach
1/2 a lemon
1 head of garlic
3 T butter
olive oil
salt
pepper

Cut the top off of the head of garlic, exposing the tops of most of the individual cloves. Place on foil & drizzle with olive oil. Bake in the toaster oven at 350 for about 25 minutes, or until garlic is golden and soft. While garlic is cooking, wash the spinach and chop it up coarsely, removing as many of the stems as possible, pat dry with a paper towel & place in a large saute pot. Add a little olive oil, 1 tablespoon butter and a little salt & pepper, squeeze the juice of 1/4 of a lemon, turn on medium heat, stir occasionally until spinach reduces and is cooked but not wilted (about 4-6 minutes). When the garlic clove is done roasting, smash up 3-4 cloves and stir into spinach. In a large pan, heat a few tablespoons olive oil and 1 T butter on medium heat. Sprinkle salt and pepper all sides of each halibut steak. Add fish to the heated pan and squeeze 1/4 of a lemon over the fish, cook about 4 minutes. Flip, squeeze more lemon and cook about 4 minutes..flip again and give it another minute, or until fillets are golden, one more flip to brown that other side. Serve with the spinach and 3-4 cloves roasted garlic on the side. Healthy, delicious, even though the photo was junk ;o)

Photobucket

Don't forget Sweet Life Kitchen's FIRST GIVEAWAY EVER!!!~CLICK HERE for DETAILS~

Tuesday, September 8, 2009

Tailgating with Dorie~ A COOKBOOK GIVEAWAY!!

Photobucket

Well, the more accurate title for this post would be Biscuits with Dorie, but because I made these biscuits for our first tailgate of the year, I was inspired to come up with a football themed pots title...Biscuits are perfect in many, many settings- including on a paper plate with fresh berry jam, on a Saturday game-morning at the start of the season. While making these biscuits I though about how much I love my copy of Baking from My Home to Yours, by Dorie Greenspan. I purchased it when I joined the weekly baking ranks of Tuesdays with Dorie, and loved each and every recipe I tried! While I was unable to keep up with my weekly TWD commitment, I still cherish this book and use it VERY often!! There are so many great recipes that are really not all that technically difficult and yield professional, delicious results. When I make something from this book I prefer to post the link to buy the book vs posting a copy of the recipe...I've decided to go one step further and GIVE YOU THE BOOK!!! THAT'S RIGHT, A FREE COPY OF DORIE GREENSPAN'S BAKING; FROM MY HOME TO YOURS!!!!

Just type "Tuesdays with Dorie" into the search feature on this blog to get a tiny idea of the bounty of glorious recipes that this awesome book contains! Mine is a floury-sticky mess, but don't worry, the winner will receive a shiny new copy~ ready to get coated in flour and sugar!

Photobucket

Here's how it's going to go down~
All you have to do is POST A COMMENT with your favorite Dorie recipe or if you've never tried one, the one you'd like to try, on to this post on or before Tuesday September 15th and a winner will be chosen at 6pm PST on Tuesday September 15, 2009.

I'll post links back to this giveaway on my TWITTER and FACEBOOK page to remind you to get your post up before 9/15/09 at 6pm PST!!
Good Luck~

Zucchini Carrot Muffins

Photobucket

Nana grows zucchini and mid-August it is very abundant around here!! We'd also purchased a big bundle of carrots at the market with the intention of juicing them...but on a Saturday afternoon of cleaning out the fridge we decided to try this combo in a muffin, totally delicious. I had never tried zucchini bread until a few years ago when Nate made it with the awesome zuchini from Nana. I couldn't believe how much I loved it. She makes a FABULOUS chocolate zucchini cake that I will have
to make and share with you soon, but for now enjoy this combo-muffin~ a yummy veggie-filled snack that is perfect any time of day!!

Makes 24 muffins
1 1/2 cups shredded carrots & zucchini
1 1/2 cups all-purpose flour
3/4 cup sugar
1 tsp baking soda
1/2 heaping tsp baking powder
1/2 tsp ground cinnamon
1/2 teaspoon salt
1 egg, lightly beaten
1/2 cup vegetable oil
1/4 cup milk
1 teaspoon vanilla extract
1 handful mini chocolate chips
1 1/2 handfuls crushed pecans

Pre-heat oven to 350, and line a muffin tin with paper liners. Sift together the flour, baking soda, baking powder, cinnamon and salt- set aside. In a stand mixer, using the paddle attachment, cream together the eggs and sugar. Add the zucchini, carrots, oil, milk and vanilla and mix about 30-45 seconds, until ingredients are well combined. With the mixer on a low speed add the flour mixture slowly, and mix just until dry ingredients are incorporated. Using a large spoon or spatula, stir the chocolate chips and pecans into the batter. Fill each muffin cup a bit over 3/4 full and bake 20-25 minutes, or until a toothpick comes out clean.

Photobucket

Saturday, September 5, 2009

Mama Corrado Pasta Salad

Photobucket

On summer Thursdays in LA we gravitate to the Santa Monica pier for picnic dinners and some outside week-night relaxing, sad to see it coming to a close, I will cherish these evenings in the sand eating dinner with friends. This year, on September 9th, 2009 the pier will turn 100 years old and we'll be down at the beach watching the fireworks and eating dinner on the sand one more time before we head full force into fall, football and snow (boarding for Nate, skiing for me!)...

A few weeks back when I took the PICNIC CHICKEN to the pier, I also attempted to pay tribute to a family tradition of a favorite girl. My friend Natalie has a mom that knows what is up in the kitchen. I mean it, and you KNOW what I am takin' about. They have spectacular get-togethers and after one of those, Natalie brought in some leftovers of a pasta salad that was awesome, and I'd never had anything like it before!!
It had everything rockin and can feed a big group of hungry fun-having friends with out spending a zillion dollars.

Photobucket

This should be called Tribute to Mama Corrado Salad, because although Natalie & Naomi gave mine the thumbs up, I had the real deal again this past weekend and I think because I 1/2'd the recipe mine was not quite the same...I'll go full batch next time and tote this yummy pasta, tuna, egg salad down to the Coliseum to chow on before we watch the Trojans win some football!! WOOHOOOOO!

1 regular sized bag Macaroni pasta
4 8oz cans Tuna
8 Hard boiled eggs, chopped
4 ice cream scooper scoops of Mayonnaise
1 ice cream Mustard
6-8 Chopped sweet pickles (I used 12 cornichons)
1 can of sweet peas
salt & pepper to taste

Bring water to a boil in a large saucepot. Cook macaroni about 9 minutes or until cooked a bit aldente (you don't want it overcooked and mushy!)Drain and cool pasta.

Mix the macaroni, tuna, eggs, sweet pickles, peas, salt and pepper together in a large bowl. Add the mayo and mustard, and mix until everything is incorporated. Refrigerate at least 4 hours.

Photobucket

Delicious
Bookmark this on Delicious
www.tips-fb.com

Thursday, September 3, 2009

Thursday Tweet Treats~

So as I'd mentioned last week, I've joined the ranks of tweeting twitterers and decided a great challenge/use for my twitter account would be to come up with recipes so easy they could be captured in 140 characters or less, ingredients & instructions bada-bing.

Two recipes down and many more to come, I plan to continue this at LEAST every Thursday~ so be sure to FOLLOW ME on Twitter so you are sure not to miss any of the so-easy-you-can-tweet-em goodness~

THIS WEEKS THURSDAY TWEET TREAT is a delicious all-fruit smoothie;

Photobucket

It's been VERY hot in L.A. and unfortunately, there is a VERY large fire burning not too far from where I live and work. We feel awful for all the people, animals & homes that have been hurt by this fire and really hope it gets under control soon.

Wednesday, September 2, 2009

Picnic Steak Samich

Photobucket

Sometimes it's all about an AMAZING sandwich, or samich, as this particular recipe creates.
With Fall right around the corner, it's time to start planning our tailgating menus and Sunday afternoon football party feasts! Nate suggested this for last Thursday night's pier picnic dinner and we were all very grateful for his inspiration.
This is very easy to put together, the flavor is off the chain and you can feed a good sized group with out seriously breaking the bank. So...be sure you add this bad boy to your Fall get-together menu and HAPPY FOOTBALL SEASON EVERYONE~

This makes 2 Giant Samiches, each samich feeds about 6-8 adults
1 tri-tip (about 2 lbs.)
tri-tip rub*
2 large loaves French bread
1 batch of garlic aioli**
4 avocados
1 sweet white onion
the best balsamic vinegar you can find (my favorite is from Joan's on Third, 18 years old- thick- almost sweet- and beyond delicious)

Tri-Tip Rub
In a small bowl mix equal parts (a few tablespoons)Kosher salt & cracked black pepper, then add in a few teaspoons garlic powder & onion powder, throw in a pinch of cayenne & 3 cloves minced fresh garlic.

Garlic Aioli
3 cloves garlic
1 raw large egg
1/2 cup olive oil
Juice from 1/2 a lemon
3 T. mayo
a pinch of salt and a little bit of cracked black pepper

In a food processor, blend the garlic, egg, lemon juice salt and pepper. Slowly add the olive oil and continue to process. Once all the olive oil is added process about 1-2 minutes, add mayo, then process another 30 seconds- 1 minute and transfer to container with a secure lid, refrigerate 1 hour.

Slice the onion and throw it in a saute pan on low heat with a few tablespoons of olive oil. Continue to stir the onions occasionally and saute on lowest heat for about 45 minutes, until they are all caramelized and gloriously golden looking. While you are caramelizing the onions, grill that tri-tip! Trim off any major excess fat, if it is not already pretty trimmed. Rub it with the spice/garlic mix and toss it on the grill (on medium heat), for about 45 minutes flipping 2-3 times until the internal temperature is about 140-150 degrees, cook longer if you'd like it more medium to well done.

Let the tri tip cool completely, when the onions are all caramelized, set them aside to cool completely as well.

Slice the tri-tip thin for stackin on the bread. Slice the avocados (you'll use two avocados on each samich). Slice the French bread open lengthwise. On the top half of each loaf, generously slather aioli. On the bottom layer lightly drizzle the balsamic vinegar (if you are worried about the steadiness of your hand and don't want to annihilate the bread by accidentally dumping the bottle, pour it in little pours into a large spoon and use that for drizzling.)
Layer caramelized onions on the bottom half of each loaf, over the balsamic, then layer the tri tip over the onions. Top the tri tip with avocado slices and top with the aioli'd top half of bread. SHIZAM- awesome, amazing samich perfection.
Slice each according to how many folks you've got coming to grub down and what else you may be serving on the side...(two great side-suggestions comin ASAP!! Keep ya posted)

Photobucket