Showing posts with label kid-friendly. Show all posts

Friday, October 25, 2013

Homemade play-dough


This has been a long time coming. Logan loves play-dough, but leaves it out and it gets dry and we tend to go through lots and lots and lots of play-dough over here. Not an option on my budget. I have pinned at least 10 different blog posts for homemade play-dough and today, finally, tried one- and can totally delete all the other pins now.

I also found a great, useful blog with tons of other great ideas too!

This recipe comes from Erika at Musings from a Stay at Home Mom. (you probably have this pinned too and just haven't tried it yet.....I say again, delete all your other homemade play-dough pins, this one RULES.)

A single batch is about 2 normal or 4 small sized store-bought container sizes. This will be fun for us to play with regularly, but also, the next time I have a kid-party, this is totally gonna be the favor.
My struggle with this first trial batch was the color. I had some candy melt coloring that I used conservatively, but would definitely kick up the color next time- with some all-natural food coloring (beets= red, purple from cabbage, green tea etc...) Promise to try that soon and update the results here!

Here's what you'll need
a 2 qt saucepan
1 cup all purpose flour
1/3 cup salt
2 tsp cream of tartar
1 cup room temp water
1 T. vegetable oil
food coloring
wax paper

Whisk the dry ingredients together in a bowl (the flour, salt & cream of tartar.)
Lay a sheet of wax paper on the counter to cool the dough on.
Place the sauce pan over medium-low heat- pour in the water, add the oil- and stir in the bowl of dry ingredients. Keep stirring- it will start to thicken pretty quick. Keep stirring....as it thickens a bit more (after stirring a minute or 2) add the food coloring....keep stirring.....stir some more.
Stir until it is thick, and gathers around the spoon, clinging to it.
This happens pretty fast, she's not joking when she says it takes 10 minutes to make this stuff.
Transfer the dough to the wax paper to cool.
Once cooled, kneed it a bit to get out any lumpiness and create uniform texture.
Keep in an airtight container.

See Erika's original post HERE and her blog Musings from a Stay at Home Mom that's full of other great ideas as well.

Friday, October 11, 2013

Orzo with kale


It really doesn't get too much easier than this with out picking up the phone and trying to be patient while you wait for the pizza guy...which reminds me, it's been a while since I've done that, and now pizza sounds really good. Blast.

Here is what you will need
1 package orzo pasta (from Trader Joes) cooked according to package... boil it about 9 minutes, drain then put back in the pot to make the rest of this "masterpiece"!
4 sausages, cooked and chopped into small pieces (I used chicken feta - grill em or if it just so happens to rain or you run out of propane like I did- throw em in the toaster oven!)
2 handfuls kale, chop fine
4 T cream cheese (halfa block)- cubed
1/3 cup tomato vodka sauce (this is a jarred pasta sauce I get at Trader joes and my son LOVES so I always have it- you can totally sub any tomato sauce you'd like)

After you boil the orzo, drain it & put it back in the pot, add the cream cheese and tomato sauce immediately, turn on the lowest heat possible and stir the sauce & cream cheese until cheese is totally melted. Add sausage & kale, stir about 5-10 minutes till kale is a little softer.
YUM!
Since we used chicken feta sausage, I topped this with feta & it was soooooo good!


Thursday, October 10, 2013

Power bowls of yumminess


I am so sure I didn't invent this "recipe" but love it and could eat one of these every day. Lately, to save time, money and make my meal prep quicker- I cook a batch of quinoa every Sunday, then on Tuesday or Wednesday make either a batch of pasta or a batch of brown rice. This was dinner on the night that I had just enough of the quinoa left and plenty of rice- it's been a massive help in my meal planning and getting dinner ready fast so we can eat all together more often

Here is what you will need (serves 4)

 1 cup dry quinoa (prep according to package)
1 cup dry Brown rice (prep according to package)
1 avocado, chopped
1 mango, chopped
1 cup shelled steamed edamame (you can buy this frozen, hullo easy fabulousness!)
1/4 cup pickled ginger chopped
a handful of kale "microchips" (from THIS POST)
Dried seaweed sheets (one package, you'll have leftovers- or skip this if you are not down with the dried sea weed!)
sesame seeds
Soy/ wasabi or ginger miso dressing  (you can buy ginger miso salad dressing, it's yummy....or, what we did, was mix a bit of wasabi in some low sodium soy sauce and drizzle it over everything!)

For each bowl, mix 1/2 cup cooked, cooled quinoa, 1/2 cup cooked, cooled brown rice- 1/4 avocado, 1/4 mango, 1/4 cup edamame, some ginger, sprinkle w sesame seeds & kale chips serve w seaweed sheets as an option.

Thursday, September 26, 2013

Sweet Potato w White Beans & Kale


Ok, this barley qualifies as a "recipe" by any stretch of the imagination, but I am trying to incorporate more vegan meals into our routine and this was a SUPER easy lunch I made that Logan and I totally loved. I've also never posted about the amazingness of kale chips before so that made it worthy of a post on it's own.

Here's what you will need
Serves 4

2 sweet potatoes, scrubbed
1 15oz can white beans, drained & rinsed
Kale, finely chopped- stems removed
Olive oil
Salt

This was for lunch, with a 2 year old, feel free to oven bake the sweet potatoes when you make this- I didn't have time!
I punctured both potatoes & microwaved them on 70% power for about 7 minutes- until cooked through- split them in half, sit to cool.
Preheat oven (or toaster oven!) to 350
Cover a baking sheet with foil. Place a layer of the chopped kale on the sheet.
Spray or drizzle with olive oil and lightly salt w sea salt.
Bake for about 7-10 minutes until crispy but not dark brown, watch it- you want it to still be green!!
I chopped the kale super fine because I wanted to add texture to the dish, so we called them kale "microchips", then Logan called them "crunchies" when he asked for MORE, THREE TIMES, so now that's what they are.
YUM!.

Thursday, September 19, 2013

Cheeseburger Casserole


This has been a go-to comfort food for me forever! It used to involve a certain box of shells and a silver packet full of yellow goo that could out live a hamster called "cheese". I promise you this will not be that much more time consuming, and you will feel SO much better knowing what's in it. Don't get me wrong- short cuts and shelf-life have a time & place, and I am aware that cream cheese counts as a processed food- but it's also a cheese product that requires refrigeration, so I feel better about it. Period.

Here's what you'll need (FYI this makes a GIANT skillet of food- we had this over about 3-4 nights for dinner and 2 lunches)

1 lb ground beef
1 small yellow onion finely chopped
1 bag elbow macaroni (16oz, Trader Joe's, 99cents!)
1 6oz can tomato paste
1 15oz can diced tomatoes, no sodium added, drained
4 big handfuls shredded cheddar cheese (get a big block and shred it, melts better, less preservatives you'll be glad you did)
8 oz cream cheese, cubed
2 carrots finely shredded w the cheese grater (sometimes I use carrots, I used to do finely chopped red bell pepper, but Logan is not down with that. You can also do sweet potato or add mushrooms- or ALL of that, get those veggies in there so you don't have to make a side dish!)


In a giant skillet cook the ground beef (about 7-10 minutes add onions when beef is nearly cooked, then sautee another 5 minutes or so. Add a bit of salt & pepper to taste. Drain on a plate covered in paper towels.
In a large sauce pot, cook the noodles according to package- & drain. Put the skillet back on the stove on low heat, pour the noodles in, add the beef and onions and slowly stir in remaining ingredients- carefully- this will be one FULL skillet. 
Once all ingredients are stirred in, heat on low and stir for another 5-10 minutes to get the cheese all melty and delicious. Add salt & pepper to taste. 
We topped this with fresh heirloom tomatoes & chives from the garden for some next-level yumminess.
A fun upgrade to a childhood comfort-food classic. You're welcome.


Monday, November 12, 2012

Turkey & Veggie Meatloaf "Cupcakes"


I adore meatloaf, and as you can tell from the last few posts had mushrooms and spinach on hand, so thought a veggie-packed meatloaf would be a perfect dinner on a (finally cool) Fall night.


What you'll need for the meatloaf "cupcakes" (the cheddar mashed potato frosting is a separate post HERE)
1 lb lean ground turkey
large handful or two small handfuls of spinach- chop fine
1/3 red onion chopped
2 baby 'bellas chopped
2-3 shiitakes chopped
dash of sale & soy sauce
oregano
basil
1 egg
bread crumbs
salt & pepper

For the "glaze"
4 T katsup
1 T Worcestershire
1 tsp soy (low sod, organic)
1 tsp brown sugar

Pre heat oven to 350.

In a large bowl mix all meatloaf ingredients well- form little 2" meatballs and press into lightly oiled muffin tin.


In a small bowl mix all "glaze" ingredients and add a thin layer of the glaze to each "cupcake"


Cook at 350 25-30 minutes- let cool in tin for about 5 minutes then move onto a large platter to "frost" with cheddar mashed potatoes!


Enjoy!


Tuesday, November 6, 2012

Mushroom, spinach, cheese & herb roll-ups


My friend Zarah makes the most kick ass mushroom & herb tart- the filling is earthy, herby, cheesy and amazing all packed in a gorgeous, flaky, delicious puff pastry. Once you taste it, you'll CRAVE it. I plan on making it soon- because it a go-to at this time of year, especially since it's an excellent freezer-meal that you can easily make 2 or 4 of and freeze the ones you don't have for dinner that night....this post, is not that post, yet. Sorry. I know, I got you drooling, and said "puff pastry" and that's just not what I'm about to break down for you. BUT, this post is awesome, and easy, and delicious and my 1 year old LOVED it. (promise, the shifty look is deep enjoyment, he's thrilled, trust me.)


The filling is inspired by Zarah's goodness, with a few additions to use up things I had and make it a one-stop-dinner- so full of veggies, no side dishes were needed. I'm busy, ok.


What you need:
6-8 baby Bella caps
3-4 shiitake mushrooms
8oz cream cheese
3-4 cloves garlic minced
2 handfuls fresh spinach chopped
Butter, olive oil
Fresh thyme & rosemary
Lasagna pasta sheets, dry
Either Greek yogurt or kale yogurt dip (see photo below)
Parmesan cheese
Salt & peppa

Start a large pot of water boiling on the stove, I think I used about 6-8 cups water.
Add 1 T butter &1T olive oil to skillet remove leaves from 6 stems of thyme then trow about 6-8 whole intact stems in- add 3 sprigs rosemary one w leaves removed from stem- let simmer on low for 5 minutes. Add garlic, simmer another 5 minutes on low.
Add mushrooms turn heat to medium, stir, cook about 6-8 minutes.
Turn heat back to low, remove intact sprigs of herbs, add spinach then cheese, stir until melted & all well mixed. Add salt and pepper to taste.
When water boils add sheets a few at a time- tend to them so they dot stick to each other- I used plastic tongs to get sheets out & onto wax paper one at a time to cool- boil until tender but aldente about 6 minutes.
When the pasta is cool enough to touch and the filling is finished, spread a thin layer of the filling into each pasta sheet, roll, place in baking dish.


Top with dip or plain yogurt- sprinkle w Parm. Bake 400 for 30min.


I made one with the plain yogurt option in the toaster oven and Logan and I taste-tested it- totally delicious, just so ya know I'm keeping it real with you ;)

I rolled em all up, put them in the pan- then they stayed in the fridge till after the dogs were walked, and all kinds of other business was attended to- then topped with dip, parm and baked for dinner! This would be a good freezer meal too-I'd definitely going to double batch and freeze a pan the next time I make this.

This recipe was DEEEEELICIOUS, huge thanks to Zarah for being an inspiration (in so many ways!) 


Friday, September 28, 2012

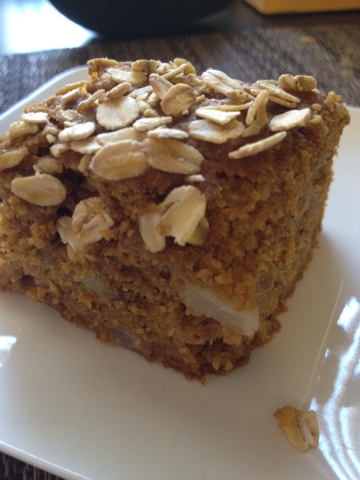
Pear & Pumpkin Goodness


This was actually supposed to be muffins, but I didn't have any muffin tin liners and cleaning that thing is a real PITA, so I opted for a big ole loafy loaf instead. I highly doubt Logan will notice the difference- if he does, I'll re-post and let you know. (update: he loved it just how it was, no love lost over not being in muffin form)

The forecast for this weekend is 95 and sweaty as S-- so why not fire up the oven and get my bake on, right?
Sorry, it's OCTOBER in 5 minutes, I couldn't hold out any longer- A/C cranked up, it's time to get my first Pumpkin recipe of the season underway....

I recently discovered Cooking With My Kid a great website you should check out ASAP! I used her "Best Ever Pumpkin Muffins" (which you will find by clicking the link above) as the basic template for this recipe.
This is so moist and yummy, it's insane. However, if you've got a major sweet tooth- step up the sugar, because at less than 2 tsp per serving- this is not super-sweet- used a little less than 1/2 a cup because I knew Logan was gonna have some. I love it this way!


Here is what you will need:

1 1/2 cup whole wheat flour (or oat flour for a gluten free option)
1/2 cup sugar (I used just a little less than that)
1 tsp baking powder
1 tsp baking soda
1/2 tsp ground ginger
1 tsp cinnamon
1/4 tsp nutmeg
1/4 tsp cloves
2 eggs lightly beaten
1/2 cup oil
1/3 cup Greek yogurt
1 15oz can pure pumpkin puree
1 tablespoon ground flax seeds
a handful of rolled oats for the top
1 large pear peeled and chopped into bitsy squares

Preheat the oven to 350.
Lightly grease an 8 x 8 pan or get out those muffin tin liners & do up 2 muffin tins or mini muffin tins.
Mix all the ingredients, except oats, until they are well incorporated.
Pour into prepared pan or muffin liners.
Sprinkle oats over top
Bake 50 minutes or until a knife inserted into the center comes clean.
Reduce time to 35 minutes for regular sized muffins, 25-30 minutes for mini muffins.

HAPPY FALL!!


Thursday, September 27, 2012

Mah-valous Mac N Chee (and slow cooker black beans!)


This is something I created for my son, and ended up LOVING it myself!! Logan is super into food these days, and I am enjoying it because I know it may not last- kids will be kids and there could be an "I'll eat nothing but PB&J 3x a day" phase right around the corner. His very favorite foods are avocado, hummus, banana, blueberries, black beans and of course #1: CHEESE.

I started making the black beans in our crock pot because they are really way less expensive that way and I have a TON to make freezer meals and usually a whole weeks worth of food with em each time I do a batch! (I just made another batch today and will do a post soon to show you how much you get for very little $$)

For the love of cats, feel free to use a can of black beans for this recipe- pre-child I sure as heck would have, it definitely cuts down on the time/work involved a bit. However, if you wanna give it a whirl, it is pretty easy. One of my all-time FAVORITE sites explains it best: A Year Of Slow Cooking: Dried Beans in the Slow Cooker Tutorial . Also, I had no idea kidney beans had a funky toxin, so the post was helpful and learned somethin' new!

Also- I sometimes use broth instead of water when cooking the beans, I've used the organic chicken and veggie broth from Trader Joe's and love both. Just an option.

Here is what you will need to make the Mac N Cheese:

1 16oz bag of Organic Brown Rice or Whole Wheat pasta
6-8 mushrooms, chopped in to little bits
1/4 of a white or yellow onion, finely chopped
2 BIG handfuls of baby spinach, chopped
1 cup or 1 can cooked black beans
2-3 cups shredded cheese
water to boil noodles
Olive oil

Heat 1 tablespoon of oil in a pan, add onions, and mushrooms- keep on med/low heat while you make the pasta.
Bring water in a medium sauce pot to a boil on the stove & add pasta- cook according to package directions for the little ones so it's not to tough to chew or for grown-up pasta, about 1 minute less than max cooking time recommended on the package.
When the pasta is ready, reserve 1/4 cup of the starchy water then drain the pasta.
Add the black beans to the onions- add salt & pepper to taste- stir about 5 minutes, till everything is hot.
Put the  pasta in a large bowl add the 1/4 cup of pasta water.
Add everything from the satuee pan and the spinach and the cheese- stir til melty delicious & enjoy!